

Quick answer: Shipping to Amazon FBA means creating a shipment in the Send to Amazon workflow, prepping and packing each unit to Amazon’s published rules, applying the right barcode and box labels, booking a carrier, and then tracking the shipment through receiving. Amazon splits the job into five stages, and almost every expensive mistake belongs to one specific stage.
Most guides walk you to the point where the boxes leave your dock and stop. The costly part happens after that: how Amazon splits your shipment, what it does when prep is wrong, and how you find the units that never showed up.
The five stages, at a glance
| Stage | What you are doing | Where it happens | The mistake that costs most |
|---|---|---|---|
| 1 | Create the shipment | Send to Amazon workflow | Box contents that do not match what is in the box |
| 2 | Prep and pack each unit | Your warehouse or prep partner | Bagging and warning rules missed |
| 3 | Barcode and label | Your label printer | Old manufacturer barcode left scannable |
| 4 | Book the carrier | Send to Amazon, step 2 or step 4 | Paying retail freight rates by default |
| 5 | Placement and receiving | Amazon’s network | Treating the split as a surprise instead of a choice |
Work the stages in order. Skipping back and forth is how box content data drifts away from what is physically in the carton.
Stage 1: Create the shipment in Send to Amazon
Amazon’s Send to Amazon walkthrough, checked today, sets out five workflow steps that vary depending on whether you are sending boxes or pallets and which carrier you pick.
- Choose what to send. Set the ship-from address, the destination marketplace, and the SKUs. Those SKUs must already be converted to FBA.
- Complete packing details. Amazon lets you save reusable case pack templates that hold box content information, box weight and dimensions, and prep and labeling details.
- Confirm shipping. Give the estimated ship date, choose small parcel or pallet, and pick a carrier. Estimated shipping costs appear once you have chosen.
- Print box labels. For every small parcel shipment, Amazon states this is the last step.
- Pallet steps. Pallet shipments add carrier and pallet count confirmation, then pallet label printing.
The case pack template is the underused part. Once it is built, you stop re-entering the same box data on every replenishment, which is where transcription errors get introduced.
For mixed-SKU boxes, or single-SKU boxes whose contents change between shipments, Amazon has you pack to your own specifications and update quantities as you pack, then finalise box contents before you confirm the destination. Finalise means finalise: get it wrong and the reconciliation work lands on you weeks later.
Stage 2: Meet Amazon’s prep and packaging rules
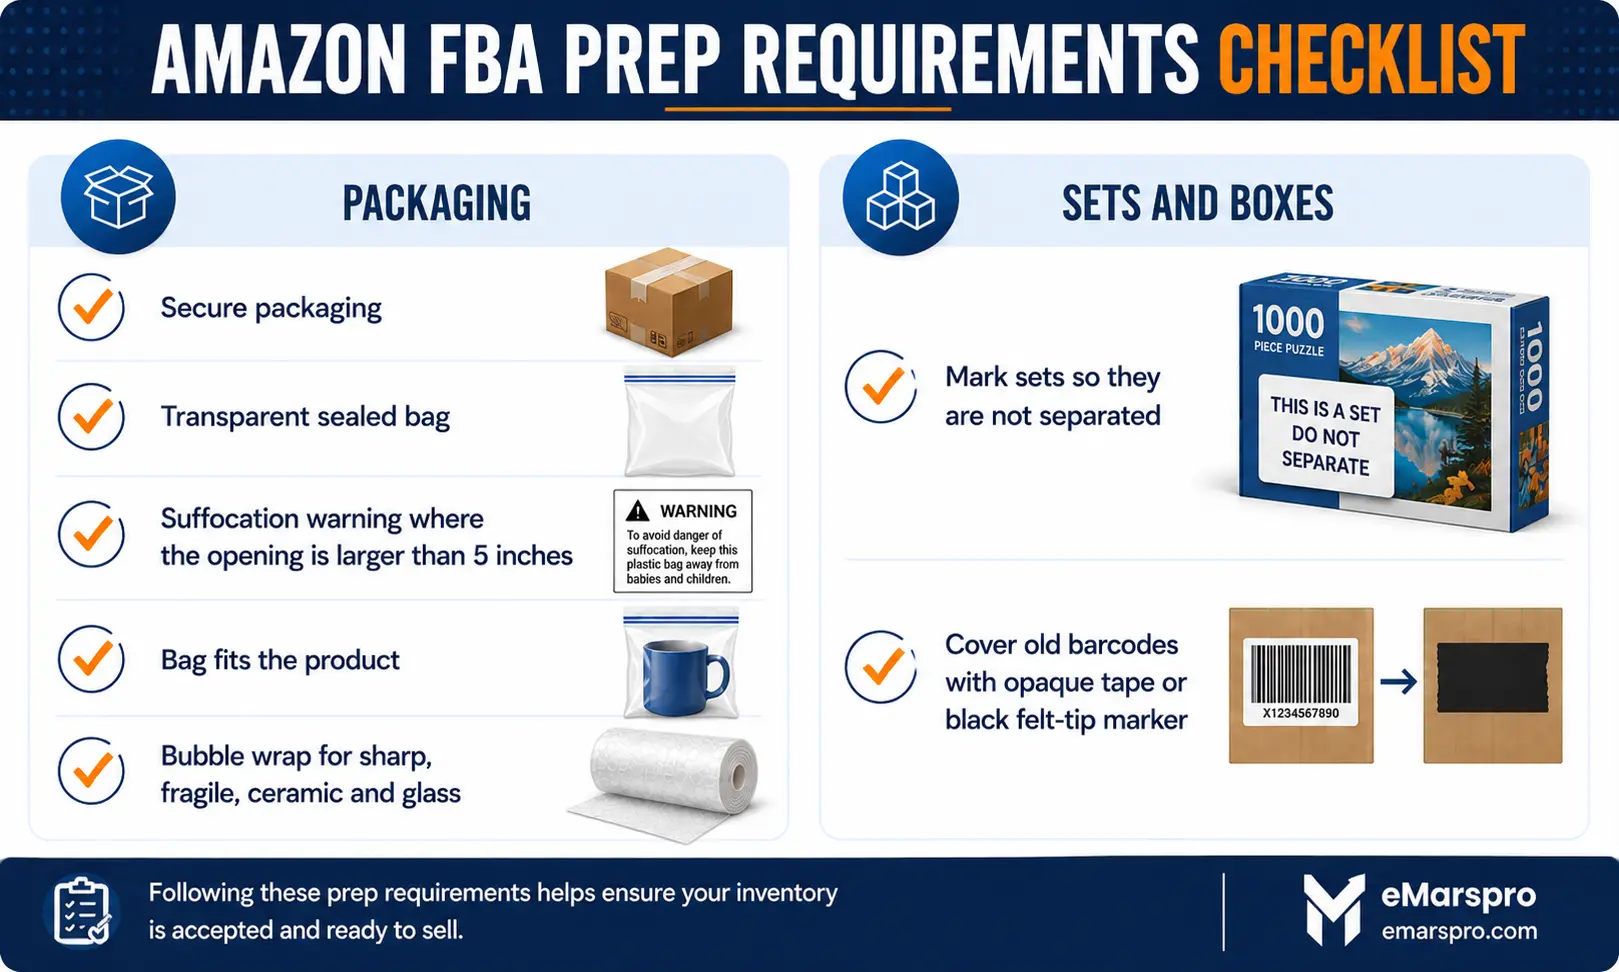
This is the stage that generates the fees nobody planned for. Amazon’s prep, packaging and labeling guide, checked today, states plainly that Amazon may refuse, return or repackage products at the seller’s expense when packaging is inadequate or non-compliant.
What Amazon’s guide requires today:
- Secure packaging on every unit. Products that arrive loose need bagging or non-adhesive bands. Items needing multi-piece assembly are not accepted.
- Bagging. Poly bags must be transparent and completely sealed. Amazon publishes the required bag thickness in its packaging and prep requirements, so pull the current figure from that page before committing to a large run.
- Suffocation warnings. Amazon requires a suffocation warning label on any bag with an opening larger than 5 inches.
- Bag fit. Bags should not extend more than 3 inches beyond the product’s dimensions, and products should not be forced into bags that are too small.
- Bubble wrap, not bags, for sharp, fragile, ceramic and glass items. Put the label on the outside of the wrap so it stays scannable.
- Footwear ships with no material exposed, in shoe boxes or in poly bags carrying a suffocation warning.
- Sets must be marked so a fulfillment centre associate knows not to separate them.
- Shipping boxes must have any old barcodes covered or removed. Amazon accepts opaque tape or a black felt-tip marker, as long as the barcode will not scan.
Amazon does not publish a box weight or dimension limit on that public page. Pull the current limits from the shipment requirements shown inside Send to Amazon rather than from any blog, this one included.
Stage 3: Apply the right barcode and print the labels
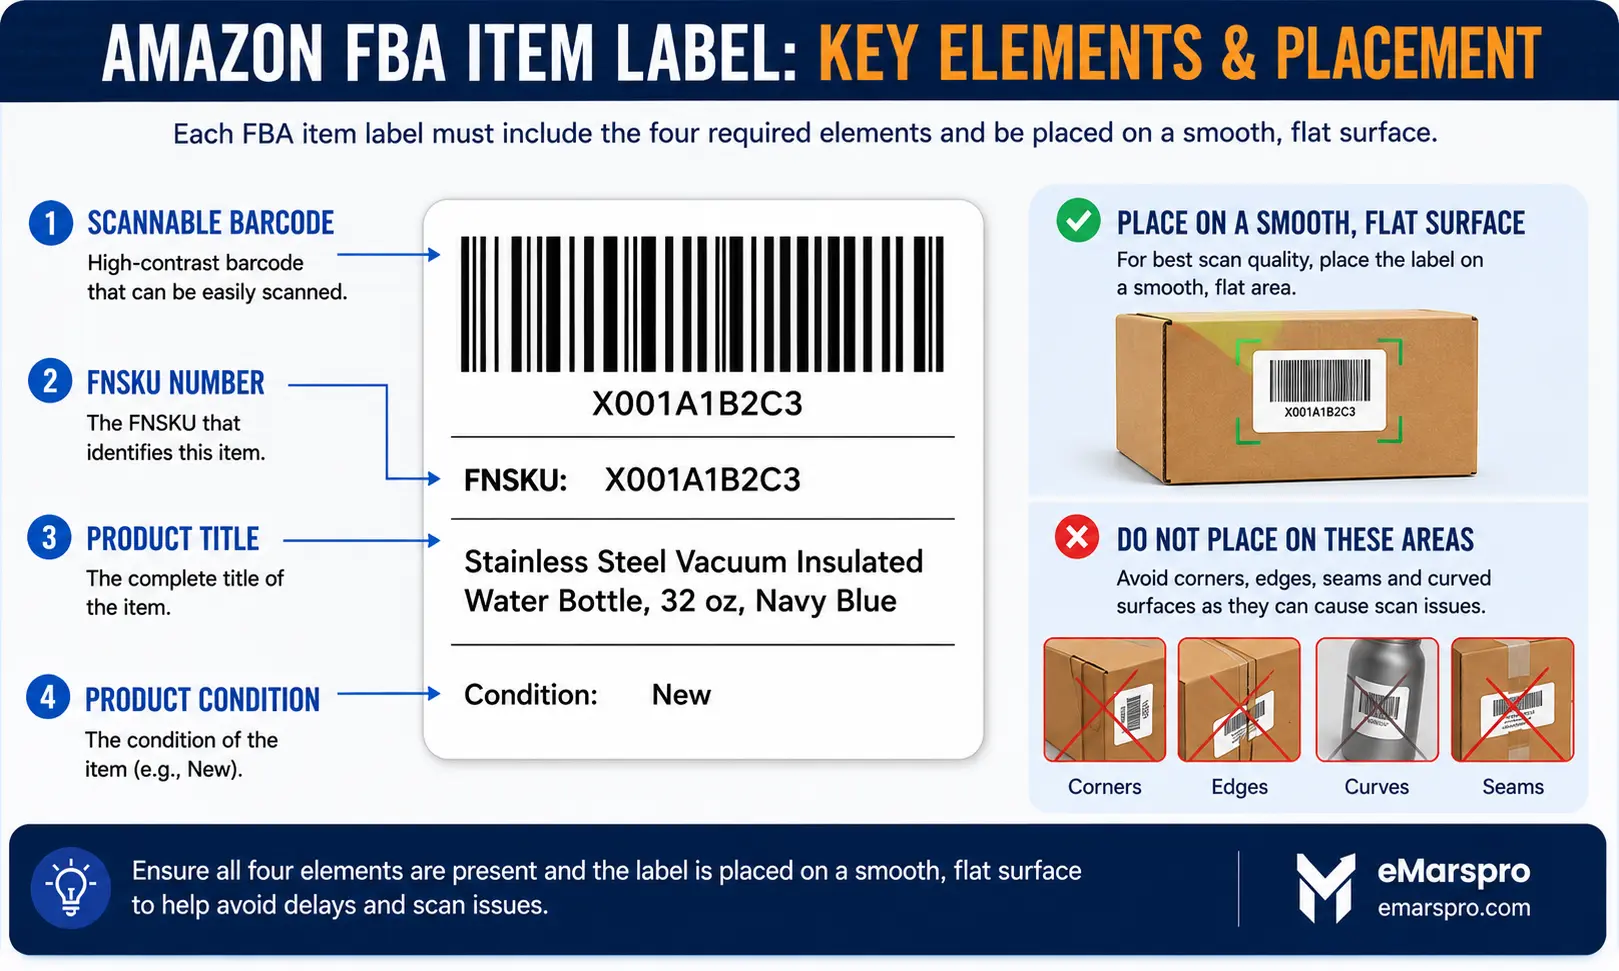
Amazon’s guide names three barcode types: manufacturer barcodes such as UPC, EAN, JAN and ISBN, Amazon barcodes for products not eligible to use the manufacturer’s, and Transparency barcodes for brand-registered sellers who want authentication.
The label spec Amazon publishes today:
| Requirement | Amazon’s stated spec |
|---|---|
| Label size | 1 to 2 inches tall, 2 to 3 inches wide |
| Ink and stock | Black ink on non-reflective paper with adhesive backing |
| Printer | Laser printer at 300 DPI |
| Must show | Scannable barcode, corresponding FNSKU number, product title, product condition |
| Placement | Smooth surfaces only, avoiding corners, edges and curves |
| Old barcodes | Cover the original manufacturer barcode so it cannot be scanned |
| Not accepted | Damaged or photocopied labels |
The single most common label failure we see on new accounts is an old manufacturer barcode left readable next to the new FNSKU. Two scannable barcodes on one unit is how stock gets commingled or misrouted, and the unit stops matching your listing.
If you want to understand the identifier Amazon puts on the item after it arrives, our guide to Amazon LPN numbers covers how the fulfillment centre tracks the physical unit.
Stage 4: Book a carrier, or use Amazon’s Partner Carrier program
Amazon’s own Partner Carrier program page, checked today, describes a domestic inbound shipping option for sellers sending stock into Amazon’s US fulfillment and distribution networks.
What Amazon states about it today:
- Covers small parcel, less-than-truckload, full-truckload and intermodal shipments.
- Feeds FBA, Multichannel Fulfillment and Amazon Warehousing and Distribution.
- You select a partner carrier at step 2 of Send to Amazon for small parcel, or step 4 for LTL, FTL and intermodal, with cost estimates shown in real time.
- Amazon states shipping costs through the program are up to 25% lower than the alternatives it compares against.
- Available to sellers using FBA, MCF or AWD across the 48 contiguous US states.
The practical read: get a quote from the program inside the workflow and compare it against your own freight rate before every large inbound. Sellers with genuinely good negotiated rates sometimes beat it. Sellers who never check are usually paying retail.
Stage 5: Inbound placement and why one shipment becomes several
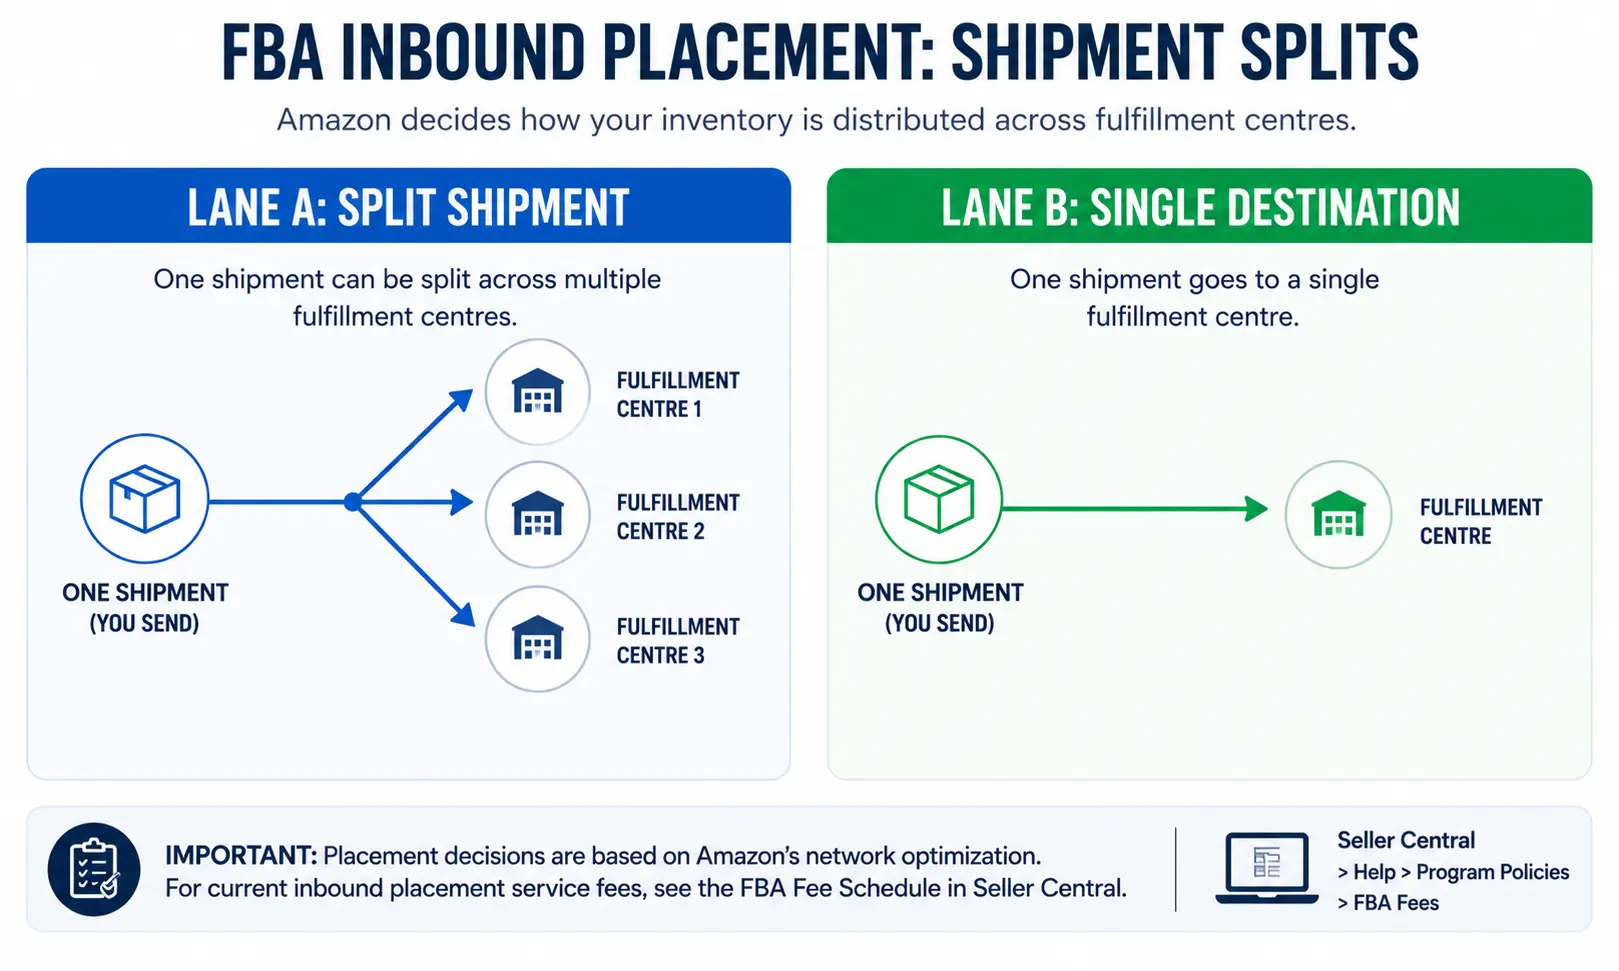
Amazon may ask you to send one shipment to several fulfillment centres rather than one. That is placement, and Amazon’s own Fulfillment by Amazon page lists FBA inbound placement service as one of its cost categories today, alongside fulfillment, storage, aged inventory, returns processing and removal.
Amazon does not publish placement rates on its public pages. Pull the current rates from the FBA fee schedule inside Seller Central before you plan a large inbound, and treat any rate you read in a blog, including ours, as out of date.
What to do with that, operationally:
- Model both options in Send to Amazon before you confirm, because the workflow shows you the split it wants.
- Compare the placement cost against the extra freight of shipping to several destinations yourself.
- Decide it deliberately per shipment. The default is a decision too, just not one you made.
The fees that land after your stock arrives are the other half of this calculation, and they are the ones most sellers discover only in the settlement report.
After the truck leaves: receiving and reconciliation
Amazon publishes no public receiving-time commitment, so treat any specific day count you read online as guesswork. Track the real thing instead, in the shipment view inside Seller Central, where received quantities update against what you sent.
Your reconciliation checklist, once a shipment closes:
- Compare units sent against units received, per SKU, not per shipment.
- Open a case on any variance before Amazon’s claim window on that shipment closes.
- Check that every SKU went sellable rather than landing without an active offer, which is how units end up as stranded inventory earning nothing while still costing storage.
- File the carrier proof of delivery with the shipment record. Without it, a lost-shipment case has no evidence.
For what happens to your units once Amazon takes them in, see how Amazon receives and stores what you send.
Where shipments go wrong, by stage
| Stage | Failure | What it actually costs | The fix |
|---|---|---|---|
| 1 | Box contents do not match the physical box | Receiving discrepancies, manual reconciliation, unrecoverable units | Build case pack templates and finalise box contents before confirming the destination |
| 2 | Bagging, warning label or bubble wrap missed | Amazon may refuse, return or repackage at your expense | Run the prep checklist per SKU, not per shipment |
| 3 | Old manufacturer barcode left scannable | Misrouted or commingled units, listings that do not match stock | Cover the old barcode before the FNSKU goes on |
| 4 | Carrier booked outside the workflow by habit | Retail freight rates on every inbound | Quote the Partner Carrier program inside Send to Amazon and compare every time |
| 5 | Placement split treated as a surprise | Placement charges nobody budgeted for | Model both options in the workflow before confirming, and pull current rates from Seller Central |
Frequently Asked Questions
Convert your listings to FBA, then open the Send to Amazon workflow in Seller Central. Set your ship-from address and destination marketplace, choose the SKUs and quantities, complete the packing details, confirm your ship date and shipping mode, choose a carrier, and print your box labels. For small parcel shipments, Amazon states that printing box labels is the final step.
Amazon’s prep guide requires secure packaging on every unit, transparent sealed bagging where bagging applies, a suffocation warning on any bag with an opening larger than 5 inches, and full bubble wrap rather than bagging for sharp, fragile, ceramic and glass items. Amazon may refuse, return or repackage non-compliant products at the seller’s expense.
Amazon publishes a label size of 1 to 2 inches tall and 2 to 3 inches wide, printed in black ink on non-reflective paper with adhesive backing, using a laser printer at 300 DPI. Each label must show a scannable barcode, the corresponding FNSKU number, the product title and the product condition. Damaged or photocopied labels are not accepted.
Quote both. Amazon’s Partner Carrier program covers small parcel, LTL, full-truckload and intermodal shipments across the 48 contiguous US states, is selected inside Send to Amazon, and Amazon states its costs are up to 25% lower than the alternatives it compares against. Sellers with strong negotiated freight rates sometimes beat it, but you only know by comparing on each shipment.
Amazon distributes inventory across its network so units sit closer to buyers. Sending to the destinations Amazon asks for is standard inbound. When you choose to send to fewer, Amazon lists FBA inbound placement service as one of its FBA cost categories. Current rates sit in the fee schedule inside Seller Central.
Variances Nobody Has Time To Chase?
A single weak stage in forecasting, prep, freight, placement, receiving, or reconciliation shows up as fees rather than as an alert. eMarspro has managed marketplace accounts since 2011 across 300+ brands and 60+ marketplaces. If that sounds familiar, it’s usually a process gap rather than a warehouse problem: we run a free account audit and send findings within 48 hours.